> For the complete documentation index, see [llms.txt](https://help.pletox.com/llms.txt). Markdown versions of documentation pages are available by appending `.md` to page URLs; this page is available as [Markdown](https://help.pletox.com/files.md).
# Files
The Files Module in Pletox is a centralized document management system that allows organizations to securely store, organize, and manage files related to employees, departments, or business operations
This module enables to upload and control access to files, while **employees** can view or upload files. It helps maintain structured documentation, reduces dependency on external storage tools, and ensures easy access to important records.\
\
**Features & Functionalities**
#### **File Listing Section**
The main table displays all files and folders with the following columns:
#### • Name of the File/Folder
Displays the file or folder name visible to the user.
#### • Owner
Shows the name of the Admin/SuperAdmin who uploaded or created the file/folder.
#### • Last Modified
Displays the date on which the file or folder was last updated.
#### • File Size
Shows the size of the uploaded file.\
(Folder size is calculated based on the files it contains.)
#### • Actions (Three Dots Menu)
Each file/folder has a three-dot action menu offering the following options:
* Rename — Modify the file/folder name
* Delete — Remove the file/folder permanently
\
**Top Action Buttons:**
**Located at the top-right of the Files Module.**
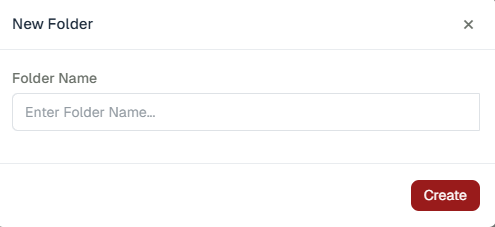
#### A. New folder:
Allows users to upload one or multiple folder.
Steps:
1. Click on New Folder.
2\. A dialog box appears asking for the Folder Name.
3\. Enter the desired name and click Create.
Result: A new folder is created and displayed in the list.
#### File Uploading
Multiple file uploads are supported. Files are auto-arranged by name/date.
#### Steps to Upload a File
1. **Select File Upload**\
click on the **File Upload** option.
2. **A file upload dialog box will appear on the screen.**
3. **Drag and Drop or Browse File**
* Drag and drop the file into the upload box, **or**
* Click **Browse** to select a file from your device.
4. **Upload the File**\
After selecting the file, click the **Upload** button to complete the process.
5. **Upload Confirmation**\
Once the file is uploaded successfully, it will be available in the system for future reference.
#### Available Actions:
#### **Rename Files/Folders**
From the three-dot menu, users can rename items without re-uploading.
#### Delete Items
Files/folders can be permanently deleted based on access rights.